How To: Manage Storage on Your Android Phone or Tablet
When you first purchased your phone, you probably never thought that you’d run out space. Lo and behold, several months later you see the feared “Low on space: Phone storage space is getting low” message.

Does it matter if your phone is low on internal memory? Yes, actually. If you have less than 15MB of memory free, you won’t be able to sync emails, Facebook statuses, calendar appointments and install over-the-air updates to your system.
One of the easiest ways to free up space on your phone is to remove and/or move any unnecessary apps from your Android’s internal storage device. But before you go deleting apps willy-nilly, its best to find the apps that take up the most space and then decide whether you want to delete or move them.
You can clear up your storage in four simple steps:
Step 1: Check Available Space

Before doing anything, check to see how much space you have left on your phone. If you’re getting the memory low message, you most likely have less than 25MB left.
To easily see how much memory is left on your phone go to Settings -> SD & phone storage and look under internal phone storage/available space.
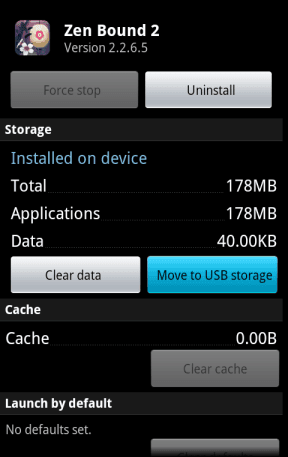
Some phones you will easily be able to see this information when you go into Settings -> Applications -> Manage Applications as evidenced by the image above.
Step 2: Manage Your Applications

Once you have noted how much space you have left, it’s time to manage your applications.
Go to Settings -> Applications -> Manage Applications.
Here, you can scroll through all of the apps that you have on your device and easily see how much space each of them take. Look for the ones that take up the most room and then decide whether you want to keep the app or not.
Step 3: Uninstall Apps

To uninstall an app, simply press the app you do not want. In the upper right hand corner is the uninstall button.
Press that and the app will remove all related files associated with the app.
This is the only real way to completely remove all of the data associated with the particular app from your internal phone storage.
Step 4: Move Apps To External Storage
If you do not wish to delete the app you can move it over to an SD or internal USB storage (depending on which Android device you use). All Android phones come with a small internal storage device and a much larger SD/USB drive that stores media like photos and movies.
In order to move your app from your internal device memory to the SD/USB storage, you will need Android version 2.2 or above. You can check what version you are using by going to Settings -> About Phone.
If you are already in the Manage applications section, just click on the app you wish to move and then click the button that saves move to SD storage (or USB in some cases). Unfortunately, you cannot move all apps over to the SD storage, only those that are not greyed out.
The process of moving over apps that you want to the SD storage may take some time depending on how many apps you have as Android does not have a way to organize apps that can be transferred to SD storage or not.
Most Android phones come with a small SD card already, however you can upgrade the card to a larger sizes to suit your needs.
That’s It!
It’s probably a good idea to go through your app list at least once a month to get rid of apps that you no longer use. This way, you will be less likely to encounter the low memory message and it will be allow you to keep your apps organized.
Good luck!
Add your first comment to this post