How To: Create and Assign Custom Ringtones
Fancy a custom ringtone?
Android comes with a default selection of notification tones and ringtones that you can use to customize the way your phone rings with every notification.
Adding, creating and assigning custom ringtones on your Android device is fairly simple. All you need are the following basic tools.
1. A File Browser App or a PC
Android comes with a basic file browser which is more than enough for you to accomplish the task. If you wish to use a third party file browser, you are more than welcome to do so. You can also use a PC to transfer and modify content from your PC to your Android device.
2. An Audio File Source
Be it a music creator, a download site or a pick from your personal creation, you would need a source of the music or sound that you will use to customize your notification ringtones. Of course, you would also need to have them in the proper format that can be recognized by the smartphone. What we need here is either an mp3, m4a, wav, or ogg file.
The Android Folder Structure
Now, let’s get on to the gritty part. First, let’s explore the file system of your Android device. The screenshot uses the ES File Explorer app, which is available and consistent for all Android devices. While you are free to create as many folders with as many labels as you wish, Android has a default folder structure for system resources and app resources.
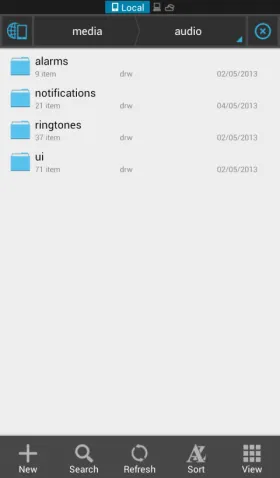
There are three basic folders you should be aware of if you plan to customize your Android ringtones. These are Alarms, Notifications, and Ringtones.
Purpose of the Folders
You may have noticed that when choosing a Ringtone for a contact, you can’t seem to choose any of the alarm tones or of the message notification tones. In the same way, you can’t choose a ringtone when you are prompted to choose a notification tone. That is because each folder is responsible for holding the list of tones meant for a specific task.
Generally, you don’t want to use a long tone for your text messages. That would be excessively distracting especially when receiving a lot of messages. In the same way, you generally look for a longer ringtone for calls since you want to be constantly notified of the incoming call. That is just the developer’s logic and it was created to organize the tones properly. You have the freedom to set a long custom tone for messages and a short custom tone for calls as you wish.
The importance of this folder structure is very simple. If you want your tone to be found in the list of a certain type, make sure you place that ringtone in the proper folder.
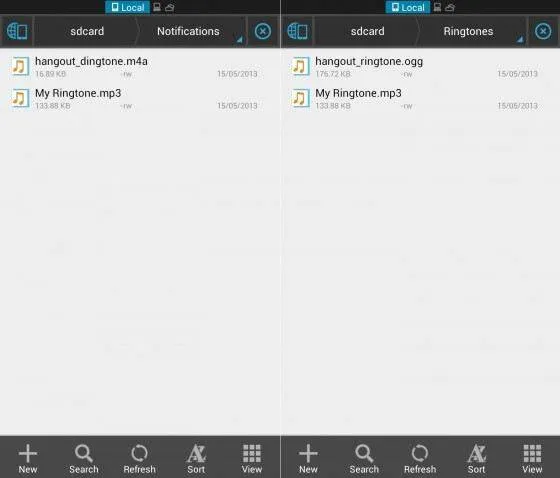
If you want your ringtone to appear when selecting Gmail tones or message tones, place the file in the Notifications folder.
If you want your ringtone to appear when selecting call tones or custom contact ringtones, place the file in the Ringtones folder.
If you want your ringtone to appear when selecting alarm clock tones, place the file in the Alarms folder.
Assigning the Ringtones
Once you have transferred the files to the proper folders, you need to assign that ringtone to your device notifications. Let’s start with the basic custom call ringtone.
1. Go to your Settings.
2. Go to your Sound settings.
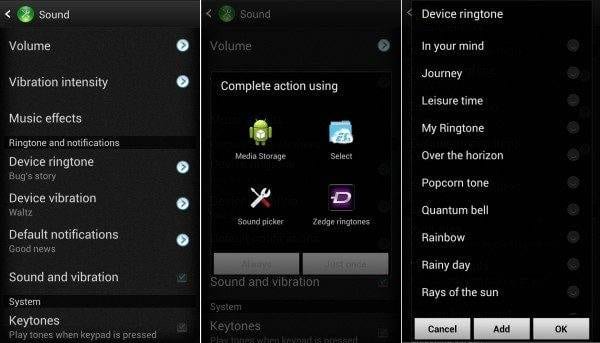
3. Choose the option that says Device Ringtone.
4. Complete the action using either Media Storage or Sound picker depending on your device.
5. Look for the file name of the Ringtone you copied to the folders. In my sample, it is My Ringtone.
Now, let’s try choosing a notification tone for your SMS and other notifications.
1. Go to your Settings.
2. Go to your Sound settings.
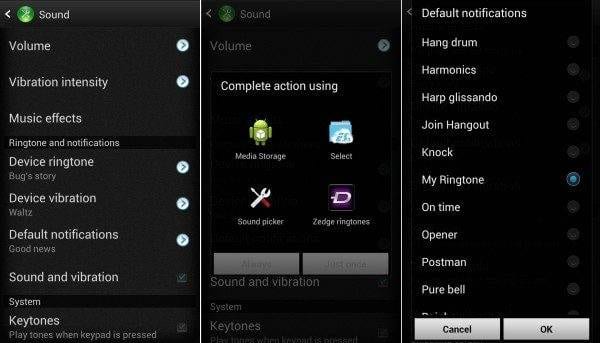
3. Choose the option that says Default Notifications.
4. Complete the action using either Media Storage or Sound picker depending on your device.
5. Look for the file name of the Ringtone you copied to the folders. In my sample, it is My Ringtone.
That’s it!
For most devices, that should be all. In cases where tones don’t appear in the list, you may need to reboot the device and allow the system to rescan the folder for files. If that doesn’t work, the file you used may be incompatible with the system.
Now go and customize your phone to fit your personal style!
Add your first comment to this post